In this blog-post I'm going to explain how you can use VisionCamera V3, TensorFlow Lite and Skia to create a funny little stickman dancing app from scratch! 🕺
While this looks insanely difficult to do, VisionCamera V3 comes with exciting new APIs that allow us to build this app without a single line of native code!
Don't want to read? Here's the full code: https://github.com/mrousavy/VisionCameraSkiaDemo
Let's get started:
Step 1: Setting up the project
- Make sure you set up your React Native development environment.
- Create a new React Native (0.71+) project, we're gonna call it
StickmanDancingApp:npx react-native init StickmanDancingApp - Run the app with
yarn ios.
Step 2: Add the Camera
To add Camera functionality to our React Native app, we're going to use react-native-vision-camera.
- Install
react-native-vision-camerafrom npm:yarn add react-native-vision-camera@rc cd ios && pod installNote: As of August 2023, VisionCamera V3 is still in "RC" (beta) mode. If VisionCamera V3 has already been released, you don't need the
@rctag in this command. See this issue for updates. - Open
ios/StickmanDancingApp/Info.plistand add the required Camera Permissions:<key>NSCameraUsageDescription</key> <string>StickmanDancingApp needs Camera access.</string> - Rebuild your app
- Now that we installed VisionCamera, let's use it! In
App.tsx, ask for permissions:function App() { const [hasPermission, setHasPermission] = useState(false) useEffect(() => { Camera.requestCameraPermission().then((p) => setHasPermission(p === 'granted') ) }, []) // ... } - Then select the Camera device you want to use. Your phone has multiple Camera devices, for this example we just want to use the front facing camera (which is pretty much always a
wide-anglecamera):function App() { // ... const devices = useCameraDevices('wide-angle-camera') const device = devices.front // ... } - And finally, we want to render the Camera:
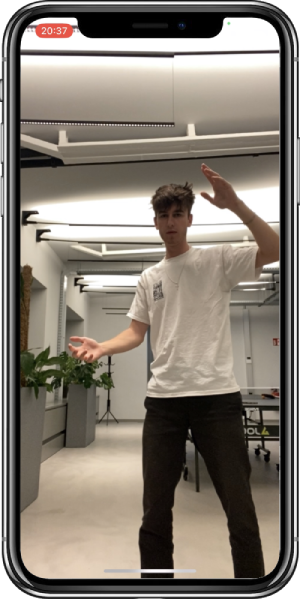
function App() { // ... return ( <View style={StyleSheet.absoluteFill}> {!hasPermission && <Text style={styles.text}>No Camera Permission.</Text>} {hasPermission && device != null && ( <Camera style={StyleSheet.absoluteFill} device={device} isActive={true} /> )} </View> ) } - And voila, we can see the Camera appear on screen:
Step 3: Enable Frame Processors
VisionCamera has a feature called "Frame Processors", which allows us to create JavaScript functions that get called for every Frame the camera "sees". In this function we can get access to the native GPU Frame buffer, allowing us to run any kind of processing such as ML-processing, face-detection, pose-detection, etc on it.
Since the Camera streams frames at a very high refresh rate (e.g. 30 FPS, 60 FPS, or even 120 FPS), we need to make sure those functions are as fast as possible. To achieve this, VisionCamera uses a lot of advanced GPU techniques and a highly optimized C++ implementation to avoid any expensive buffer copies.
This feature is only enabled if you install react-native-worklets-core, a library to create small JavaScript functions that can run on a separate Thread, focused on specific high performance tasks. This is the same concept as in react-native-reanimated.

- Install
react-native-worklets-core:You should see this appear in the output logs of theyarn add react-native-worklets-core cd ios pod installpod installcommand:
If VisionCamera doesn't detect react-native-worklets-core, make sure to investigate why, otherwise Frame Processors are not enabled![VisionCamera] react-native-worklets-core found, Frame Processors enabled! - Add the
'worklet'compiler plugin to yourbabel.config.jsmodule.exports = { // ... plugins: [ ['react-native-worklets-core/plugin'], // ... ], } - Restart your bundler:
yarn start --reset-cache - And finally add a simple Frame Processor that just logs to the console:
You should see logs appear in your metro console:
function App() { // ... const frameProcessor = useFrameProcessor((frame) => { 'worklet' console.log(`Received a ${frame.width} x ${frame.height} Frame!`) }, []) // ... <Camera // ... frameProcessor={frameProcessor} /> // ... }Received a 3048 x 2096 Frame! Received a 3048 x 2096 Frame! Received a 3048 x 2096 Frame! ...
In this Frame Processor we have access to the current Camera Frame. Every operation is fully synchronous, meaning if you take too long to finish your processing, a frame might get dropped. At 60 FPS, your Frame Processor should finish it's execution within 16.66667ms.
We can use utilities such as runAsync or runAtTargetFps to perform asynchronous or throttled processing.
Step 4: Implement pose detection using TensorFlow Lite
To implement the pose detection, we're going to use TensorFlow Lite. TensorFlow Lite is a framework to run standardized machine learning models on mobile devices. While you could also build this with other Frameworks such as PyTorch, MediaPipe, MLKit or Apple Vision, we're using TensorFlow Lite because it is easier to integrate with React Native.
To use TensorFlow Lite models in React Native we're going to use react-native-fast-tflite, a library built by me which uses a highly optimized C++ implementation that allows you to use shared ArrayBuffers without copying them - this is not only faster, but also allows us to use it within a VisionCamera Frame Processor.
-
Install
react-native-fast-tflitefrom npm:yarn add react-native-fast-tflite cd ios && pod install -
Include
.tflitefiles in your JS bundle by adding it toassetExtsin yourmetro.config.js:const {getDefaultConfig, mergeConfig} = require('@react-native/metro-config') const config = { resolver: { assetExts: ['tflite', ...getDefaultConfig(__dirname)?.resolver?.assetExts], }, } module.exports = mergeConfig(getDefaultConfig(__dirname), config) -
(Optional) If you want to use the CoreML GPU Delegate, add this to your
ios/Podfile:$EnableCoreMLDelegate=true -
Now we need to find a good pose-detection model. Here's some things to look out for:
- The model needs to be a TensorFlow Lite model (
.tfliteextension) - The model should ideally use
uint8/int8instead offloats for it's input type for faster execution. - Models often come in accurate and fast options. Download both and compare speed to choose a matching one.
- The model should ideally support the CoreML GPU delegate for faster execution.
I'm going to use the MoveNet Pose Detection (int8) model from Google (tfhub.dev), which comes in two variants; "thunder" (more accurate) and "lightning" (faster).
- The model needs to be a TensorFlow Lite model (
-
Drag
lite-model-movenet-singlepose-lightning-tflite-int8-4.tfliteinto yoursrc/assets/folder (I'm going to rename it topose-detection-fast.tflite) -
Load the model:
const plugin = useTensorflowModel(require('./assets/pose-detection-fast.tflite')) -
(Optional): We should use the CoreML GPU delegate for better performance if the model supports it:
const plugin = useTensorflowModel(..., 'core-ml')
Understanding inputs/outputs
If you're new to TensorFlow, the APIs can be quite confusing. Here's a short TL;DR:
TensorFlow uses "tensors" as it's inputs and outputs. They are simply arrays of numbers. You pass in an array of numbers, and you receive an array of numbers. The way you interpret the data is up to you.
If you open your model in Netron you can inspect the types and sizes of your inputs and outputs:

In this case, we can see that there is exactly one input tensor, and one output tensor.
The input type is uint8, and it is 1 x 192 x 192 x 3 (= 110.592) values big. The 1 means a batch of one images, 192 is the image width, 192 is the image height, and 3 is the values per pixel ([R, G, B]).
The output type is float32, and it is 1 x 1 x 17 x 3 (= 51) values big. By reading the description on tfhub.dev, we can understand that the output values can be read as:
i: The Y coordinate of this pointi + 1: The X coordinate of this pointi + 2: The confidence score of this point
..where i is between 0 and 17, each representing one landmark (e.g. nose, elbow, knee, ..)
Step 5: Calling the TensorFlow Lite Pose Detection Model
Now that we understand the input data of our model, we need to prepare it accordingly:
- Cameras are usually streaming Frames in
YUVorPRIVATEformats. Since this model is trained on RGB images, we need to configure the Camera to stream inRGBformats:<Camera // ... pixelFormat="rgb" /> - Since the model expects 192x192 frames, we need to downsize the Camera Frame first. Let's create a simple JS-based resize plugin:
This assumes that the input frame is in BGRA format. On Android,
// Cache array buffer to avoid it being constantly re-allocated const CACHE_ID = '__cachedArrayForResizer' function getArrayFromCache(size: number): Int8Array { 'worklet' if (global[CACHE_ID] == null || global[CACHE_ID].length != size) { global[CACHE_ID] = new Int8Array(size) } return global[CACHE_ID] } // Resize any Frame to the target width and height in RGB format. export function resize(frame: Frame, width: number, height: number): Int8Array { 'worklet' const inputWidth = frame.width const inputHeight = frame.height const arrayData = frame.toArrayBuffer() const outputSize = width * height * 3 // 3 for RGB const outputFrame = getArrayFromCache(outputSize) for (let y = 0; y < height; y++) { for (let x = 0; x < width; x++) { // Find closest pixel from the source image const srcX = Math.floor((x / width) * inputWidth) const srcY = Math.floor((y / height) * inputHeight) // Compute the source and destination index const srcIndex = (srcY * inputWidth + srcX) * 4 // 4 for BGRA const destIndex = (y * width + x) * 3 // 3 for RGB // Convert from BGRA to RGB outputFrame[destIndex] = arrayData[srcIndex + 2] // R outputFrame[destIndex + 1] = arrayData[srcIndex + 1] // G outputFrame[destIndex + 2] = arrayData[srcIndex] // B } } return outputFrame }RGBFrames might be in RGB or RGBA format instead of BGRA, so make sure to adjust this accordingly. Also, you can implement this as a native Frame Processor Plugin to improve it's performance, e.g. by using OpenCV, Accelerate or Metal. - And finally, let's call the TensorFlow Lite plugin with our 192x192 Frame:
Perfect! We can see our TensorFlow Lite model running perfectly and returning 1 output tensor on each execution. Let's start drawing stuff!
function App() {
  // ...
  const plugin = ...

  const frameProcessor = useFrameProcessor((frame) => {
    'worklet'
    if (plugin.state === "loaded") {
      const resized = resize(frame, 192, 192)
      const outputs = plugin.model.runSync([resized])
      console.log(`Received ${outputs.length} outputs!`)
    }
  }, [plugin])
  // ...
}
Step 6: Setting up Skia
To draw stuff to a screen we're going to use Skia, an open-source cross-platform drawing library powered by Metal on iOS and OpenGL on Android.
- Let's install react-native-skia from npm:
You should see this appear in the output logs of the
yarn add @shopify/react-native-skia cd ios && pod installpod installcommand:
If VisionCamera doesn't detect react-native-skia, make sure to investigate why, otherwise Skia Frame Processors are not enabled![VisionCamera] react-native-skia found, Skia Frame Processors enabled! - Instead of
useFrameProcessor, now useuseSkiaFrameProcessor:You should see a red rectangle appear on the screen.function App() { // ... const paint = Skia.Paint() paint.setColor(Skia.Color('red')) const frameProcessor = useSkiaFrameProcessor((frame) => { 'worklet' // ... const rect = Skia.XYWHRect(150, 150, 50, 50) frame.drawRect(rect, paint) }, [plugin]) // ... } - Now that we got our Skia context set up, let's start drawing the skeleton:
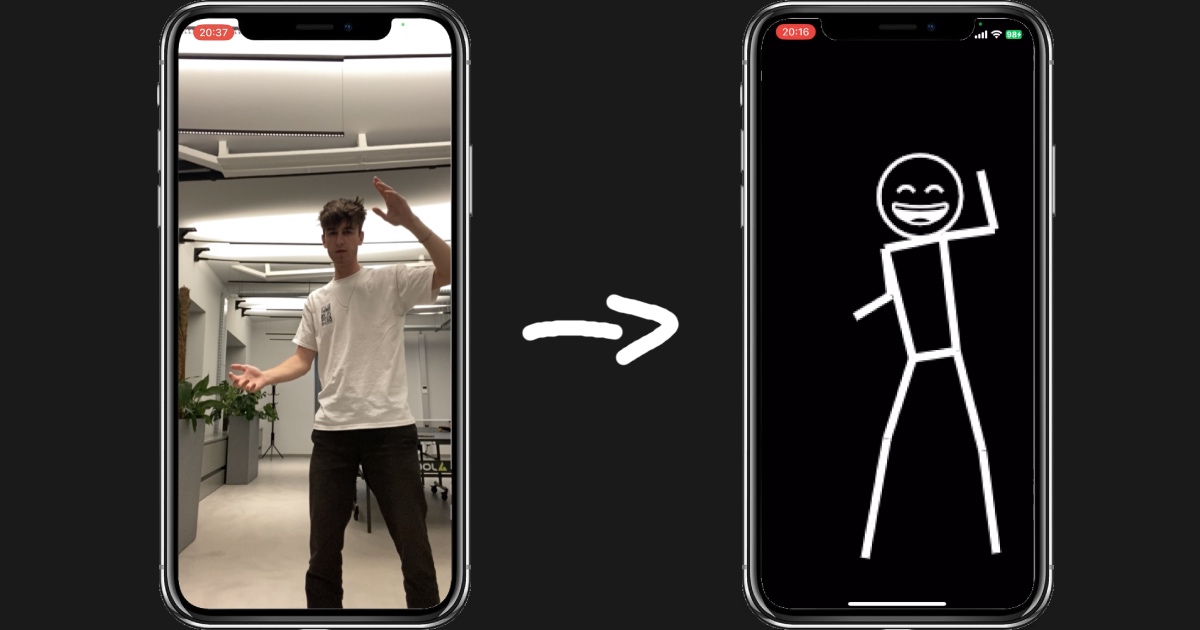
function App() { // ... // The indexes of the TFLite output model connecting the lines we want to draw const lines = [ // left shoulder -> elbow 5, 7, // right shoulder -> elbow 6, 8, // left elbow -> wrist 7, 9, // right elbow -> wrist 8, 10, // left hip -> knee 11, 13, // right hip -> knee 12, 14, // left knee -> ankle 13, 15, // right knee -> ankle 14, 16, // left hip -> right hip 11, 12, // left shoulder -> right shoulder 5, 6, // left shoulder -> left hip 5, 11, // right shoulder -> right hip 6, 12, ] // White paint for the lines const paint = Skia.Paint() paint.setStrokeWidth(5); paint.setColor(Skia.Color('white')) const frameProcessor = useSkiaFrameProcessor((frame) => { 'worklet' const resized = resize(frame, inputWidth, inputHeight) const outputs = plugin.model.runSync([smaller]) const output = outputs[0] // one output tensor const frameWidth = frame.width const frameHeight = frame.height // remove everything from the Frame, making it black frame.clear(Skia.Color('black')) // draw each line on the skeleton for (let i = 0; i < lines.length; i += 2) { const from = lines[i] const to = lines[i + 1] const confidence = output[from * 3 + 2] if (confidence > 0.5) { frame.drawLine( output[from * 3 + 1] * frameWidth, output[from * 3] * frameHeight, output[to * 3 + 1] * frameWidth, output[to * 3] * frameHeight, paint, ) } } }, [plugin, paint]) // ... } - To make things look a bit happier, let's also draw an emoji as a face:
function App() { // ... // downloaded from the internet const EMOJI_SIZE = 30 const emojiFont = useFont(require('./assets/NotoEmoji-Medium.ttf'), EMOJI_SIZE) const frameProcessor = useSkiaFrameProcessor((frame) => { 'worklet' // ... if (emojiFont != null) { const faceConfidence = output[2]; if (faceConfidence > 0.5) { const noseY = output[0] * frame.height + EMOJI_SIZE * 0.3; const noseX = output[1] * frame.width - EMOJI_SIZE / 2; frame.drawText('😄', noseX, noseY, paint, emojiFont); } } }, [plugin, paint, emojiFont]) // ... } - And voila! We can dance infront of the Camera without it looking too terrible 🥳
(Bear with me here, my dancing skills are far from perfect)
It has been an insane 2 year long journey for me to get to this point. VisionCamera V3 is changing the mobile camera game by making realtime Frame processing (+ TFLite) and drawing (+ Skia) easy to use by bringing it to React Native. 💪
Compared to other solutions, this uses significantly less code, is highly optimized for GPU processing, and benefits from fast-refresh/hot-reload so you don't have to rebuild your app when you change the color of the skeleton, apply a Skia shader, or even entirely swap out the TFLite model - it's all just a ⌘ + S away! 🤩
If you liked this post or appreciate what I'm doing with VisionCamera, TFLite, Worklets and Skia please consider sponsoring me on GitHub so I can invest into dance lessons! 🕺
Here's the full code for the app we just built: https://github.com/mrousavy/VisionCameraSkiaDemo