VisionCamera is not only the fastest Camera library for React Native, but it is also the only library that allows you to run advanced realtime Frame Processing straight from JavaScript.
That's why I'm gonna build an object detector running at 60-120 FPS using only JavaScript code while still achieving native GPU-accelerated performance! 🤯
If you don't know what Frame Processors are, they are simple JS functions that allow you to run any kind of processing on every Frame the camera sees. This is the syntax of a Frame Processor:
function App() {
  const frameProcessor = useFrameProcessor((frame) => {
    'worklet'
    console.log(`Frame is ${frame.width} by ${frame.height}`)
  }, [])

  return <Camera frameProcessor={frameProcessor}>
}
One of the most common ML APIs for mobile is TensorFlow Lite - an ML library optimized specifically for mobile devices. There's a ton of pre-trained TensorFlow Lite models available on tfhub.dev.
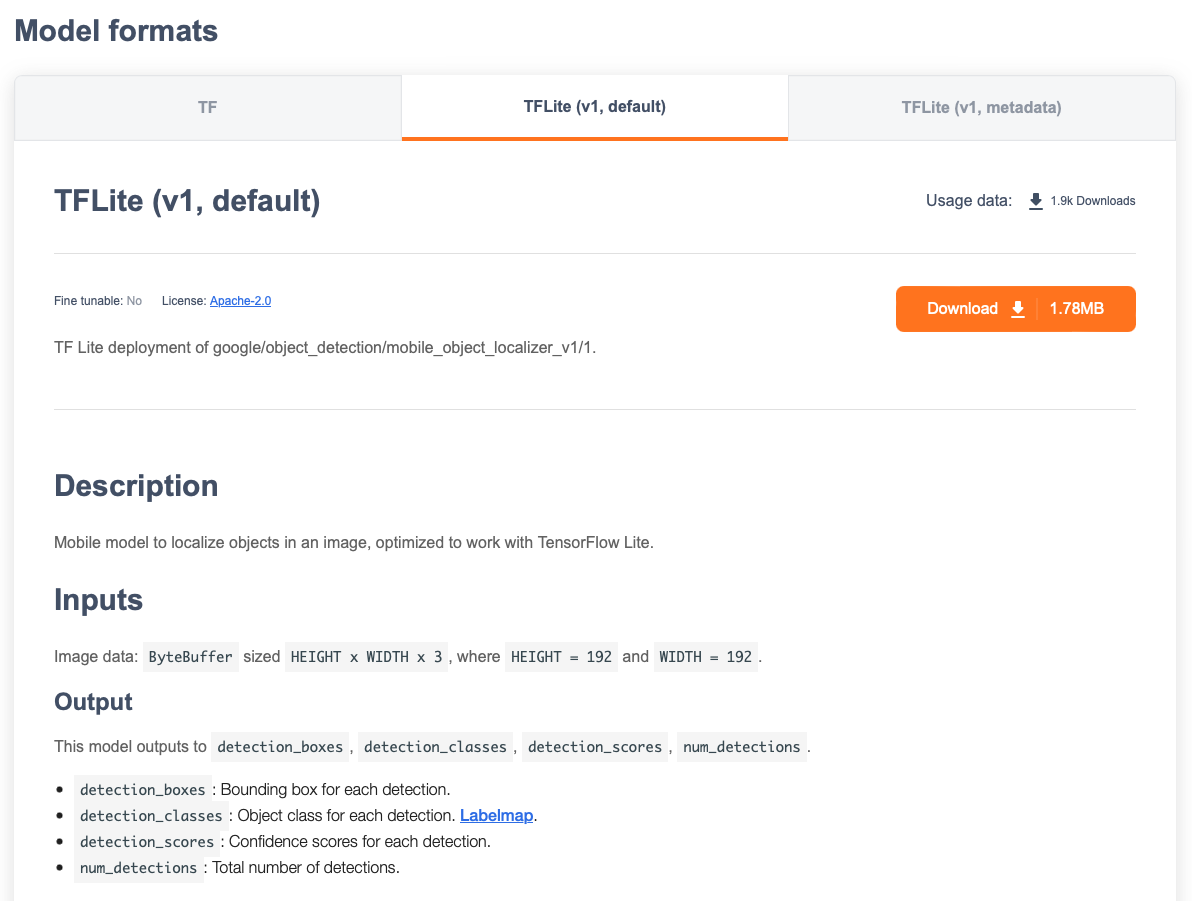
For this example, let's use the "Mobile object_localizer_v1.1" from Google to build an app that detects objects and draws a red box around it.
Understanding TensorFlow Models
All TensorFlow Lite models are .tflite files. Because of how machine learning works, you only deal in byte buffers for the inputs and outputs - no fancy objects or typed parameters.
Such buffers are called "tensors", and a TensorFlow model has one or more input tensors and one or more output tensors.
For example, the object detector model expects a 192x192 image as an input because it was trained on that specific size. Since images are in RGB, we need 3 values to represent a pixel, one for R, one for G, and one for B. So the total size of that byte buffer is 192 * 192 * 3, so 110.592 bytes.
Usually models on TFHub contain a description of their inputs and outputs. The Object Detector model from Google tells us that it expects 192x192 images as inputs and returns 4 outputs.
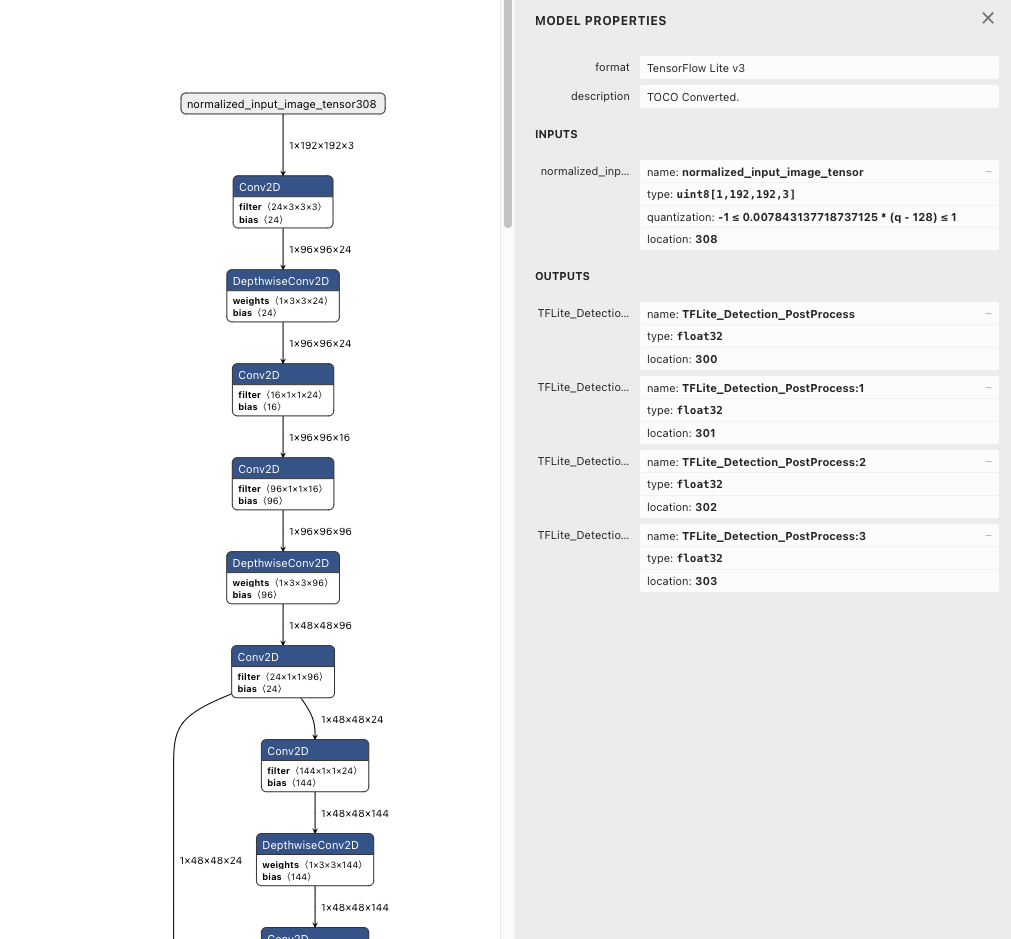
You can also use Netron to inspect any TensorFlow model. In this case we can find out that the expected input has the shape of [1, 192, 192, 3], which means 1 batch, 192 pixels width, 192 pixels height and 3 bytes per pixel (R, G, B).
While there is no real standard for input images, models that are intended for realtime use (e.g. detecting objects or faces in a feed of Camera Frames) usually have only one input tensor which expects an RGB buffer holding the image. The buffer is typically in UInt8 (one pixel ranges from 0 to 255) or Float32 (where one pixel ranges from 0.0 to 1.0).
Since it's really hard to set up TensorFlow Lite for yourself in a native Frame Processor Plugin and do the entire resizing and byte buffer filling, I've built a plugin for VisionCamera that allows you to load any TensorFlow Lite model straight from your JavaScript bundle and do any kind of output postprocessing in your JS Frame Processor! 🤯
Building the VisionCamera TensorFlow Lite Plugin
The VisionCamera TensorFlow Lite Plugin allows users to stay within the JavaScript environment and never touch any native code - not even for advanced GPU processing.
As with all libraries, I've started off by designing the user-facing APIs. JS APIs are always simple and easy to use, and this is no exception. Since we can separate the API into two steps - Loading and Executing - I've decided to use a hook for loading and a function for executing:
const plugin = useTensorflowModel(require('./object-detector.tflite'))This should load the object-detector.tflite file from the JS bundle and initialize a TensorFlow Lite instance on the native side.
But how do I get from a require('./object-detector.tflite') to an actual file? I've never loaded any assets from the JS bundle before, how do you even do that?
Loading assets from the JS bundle
I dug around the react-native core codebase to figure out how React Native loads files from the JS bundle and found the RCTImage/Image component. They have a resolveAssetSource function which seems to do exactly what I'm trying to do:
function resolveAssetSource(source: any): ?ResolvedAssetSourceSince the JS bundle is hosted on the device using a WebSocket, we can simply fetch files using a URL.
When I tried to call this however, Metro couldn't find the file and after checking the paths three hundred times I finally figured out that I needed to whitelist .tflite files to include them in the JS bundle. So in metro.config.js, I added:
// ...
module.exports = {
  // ...
  resolver: {
    // ...
    assetExts: ['tflite', ...otherFormats],
  }
}
And voilà - I got the URL for the .tflite file:
const model = require('./object-detector.tflite')
const source = Image.resolveAssetSource(model)
console.log(source.uri)
// http://10.0.0.193:8081/assets/object-detector.tflite?platform=ios&hash=32e9958c83e5db7d0d693633a9f0b175
Now I just need to pass that to native and download it to the local filesystem. Here's the code I use for downloading the file from the JS bundle to the local filesystem:
// Download Model from JS bundle to local file
NSURL* modelUrl = [[NSURL alloc] initWithString:modelPath];
NSData* modelData = [NSData dataWithContentsOfURL:modelUrl];
auto tempDirectory = [[NSFileManager defaultManager] temporaryDirectory];
auto tempFileName = [NSString stringWithFormat:@"%@.tflite", [[NSUUID UUID] UUIDString]];
auto tempFilePath = [tempDirectory URLByAppendingPathComponent:tempFileName].path;
[modelData writeToFile:tempFilePath atomically:NO];
NSLog(@"Model downloaded to \"%@\"!", tempFilePath);
Then I set up JSI bindings in the global namespace, created a Promise, started a new Thread, and called that download function:
void TensorflowPlugin::installToRuntime(jsi::Runtime& runtime, std::shared_ptr<react::CallInvoker> callInvoker) {
  auto func = jsi::Function::createFromHostFunction(runtime,
                                                    jsi::PropNameID::forAscii(runtime, "loadTensorflowModel"),
                                                    1,
                                                    [=](jsi::Runtime& runtime,
                                                        const jsi::Value& thisValue,
                                                        const jsi::Value* arguments,
                                                        size_t count) -> jsi::Value {

    auto promise = react::createPromiseAsJSIValue(runtime, [=](jsi::Runtime &runtime,
                                                               std::shared_ptr<react::Promise> promise) -> void {
      dispatch_async(dispatch_get_global_queue(DISPATCH_QUEUE_PRIORITY_DEFAULT, 0), ^{
        auto modelPath = downloadModelFromPath(arguments[0].asString(runtime));

        // TODO: Load into TensorFlow
      });
    });
    return promise;
  });

  runtime.global().setProperty(runtime, "loadTensorflowModel", func);
}
And finally, I loaded the Model into TensorFlow and resolved the Promise to get back to JavaScript:
// Load Model into Tensorflow
NSError* error;
TFLInterpreter* interpreter = [[TFLInterpreter alloc] initWithModelPath:tempFilePath
                                                                options:[[TFLInterpreterOptions alloc] init]
                                                              delegates:delegates
                                                                  error:&error];
if (error != nil) {
  promise->reject("Failed to load model!");
  return;
}

auto plugin = std::make_shared<TensorflowPlugin>(interpreter, delegate);

// Resolve Promise back on JS Thread
callInvoker->invokeAsync([=]() {
  promise->resolve(plugin);
});
Okay - we can load the TensorFlow model into a JS object, now we want to run it inside a VisionCamera Frame Processor. For that, we need to create a function on the TensorFlowPlugin called run:
jsi::Value TensorflowPlugin::run(jsi::Runtime &runtime, Frame* frame) {
  CVPixelBufferRef pixelBuffer = CMSampleBufferGetImageBuffer(frame.buffer);
  // ...
}
And to expose that to JS we need to return it in the HostObject::get overload:
jsi::Value TensorflowPlugin::get(jsi::Runtime& runtime, const jsi::PropNameID& propNameId) {
  auto propName = propNameId.utf8(runtime);

  if (propName == "run") {
    return jsi::Function::createFromHostFunction(runtime,
                                                 jsi::PropNameID::forAscii(runtime, "run"),
                                                 1,
                                                 [=](jsi::Runtime& runtime,
                                                     const jsi::Value& thisValue,
                                                     const jsi::Value* arguments,
                                                     size_t count) -> jsi::Value {
      auto frame = arguments[0].asObject(runtime).asHostObject<FrameHostObject>(runtime);
      return this->run(runtime, frame->frame);
    });
  }
}
Preparing the input Frame
Since the TensorFlow model is trained on a specific input size, we need to make sure our Camera Frame gets resized to that specific size.
To figure out what size the input Image should have, we can read the input tensor's shape:
NSArray<NSNumber*>* inputShape = [_inputTensor shapeWithError:&error];
if (error != nil) {
  throw std::runtime_error("Failed to get input tensor shape!");
}
In most models I found so far, the input shape is always in [batch_size, width, height, pixel_size], where:
batch_sizeis the number of byte arrays you should feed into the model. This is pretty much always 1.widthis the width of the image (in pixels) the model expects, for the object detector this is 192.heightis the height of the image (in pixels) the model expects, for the object detector this is 192.pixel_sizeis the number of values it takes to represent one pixel. For RGB we need 3 values, one for R, one for G and one for B. As with pretty much all models, the object detector also expects a pixel size of 3 here.
It is also important to know the input tensor's data type. Most models take UInt8 inputs, some models take Float32 inputs, and I haven't really seen any other data types for input images so far.
- One
UInt8value takes 8 bit (= 1 byte) and ranges from 0 to 255. In the RGB colorspace a pixel consists of three values, withUInt8this means we have 3 bytes per pixel (aka 24-bit). For example, a white pixel is represented as[255, 255, 255]. A green pixel is[0, 255, 0]. - One
Float32value takes 32 bit (= 4 bytes) and ranges from -3.4e+38 to 3.4e+38. In the RGB colorspace a pixel consists of three values, withFloat32this means we have 12 bytes per pixel (aka 96-bit). For example, a white pixel is represented as[1.0, 1.0, 1.0]. A green pixel is[0, 1.0, 0].
UInt8 is much more efficient as it only takes 1/4 of the memory, but some GPUs are faster with floating point number computation than with decimals.
Allocating the buffers
For performance reasons we want to avoid allocating a new buffer on every frame, instead we will pre-allocate a buffer for the input image and re-use that for every frame. In this case, our buffer should be 1 * 192 * 192 * 3 in size, so 110.592 values.
So to allocate the buffer we can use this code:
size_t width = inputTensor->shape->width;
size_t height = inputTensor->shape->height;
size_t pixelSize = inputTensor->shape->pixelSize;
size_t valueSize = sizeof(uint8_t); // or float32_t
void* buffer = malloc(width * height * pixelSize * valueSize);
Using Accelerate
One of the most efficient ways to do image manipulation in iOS is the Accelerate Framework, specifically the vImage APIs.
The most important type we'll be working with is vImage_Buffer, which is a simple struct that holds any kind of image buffer (aka a number array) the vImage library can work with.
I recommed reading this blog post if you want to learn more about image buffers, especially CPU vs GPU buffers.
The Frame from the Camera is no exception - it uses CMSampleBuffer which holds a CVPixelBuffer under the hood. This CVPixelBuffer gives us CPU access to the raw binary data of the Frame, so we can simply create a vImage_Buffer from that:
CVPixelBufferRef buffer = CMSampleBufferGetImageBuffer(frame.buffer);
CVPixelBufferLockBaseAddress(buffer, kCVPixelBufferLock_ReadOnly);
vImage_Buffer srcBuffer = {
  .data = CVPixelBufferGetBaseAddress(buffer),
  .width = CVPixelBufferGetWidth(buffer),
  .height = CVPixelBufferGetHeight(buffer),
  .rowBytes = CVPixelBufferGetBytesPerRow(buffer)
};
The buffer "srcBuffer" now points to the Camera Frame.
To correctly transform the image into the expected buffer we need to do 3 steps:
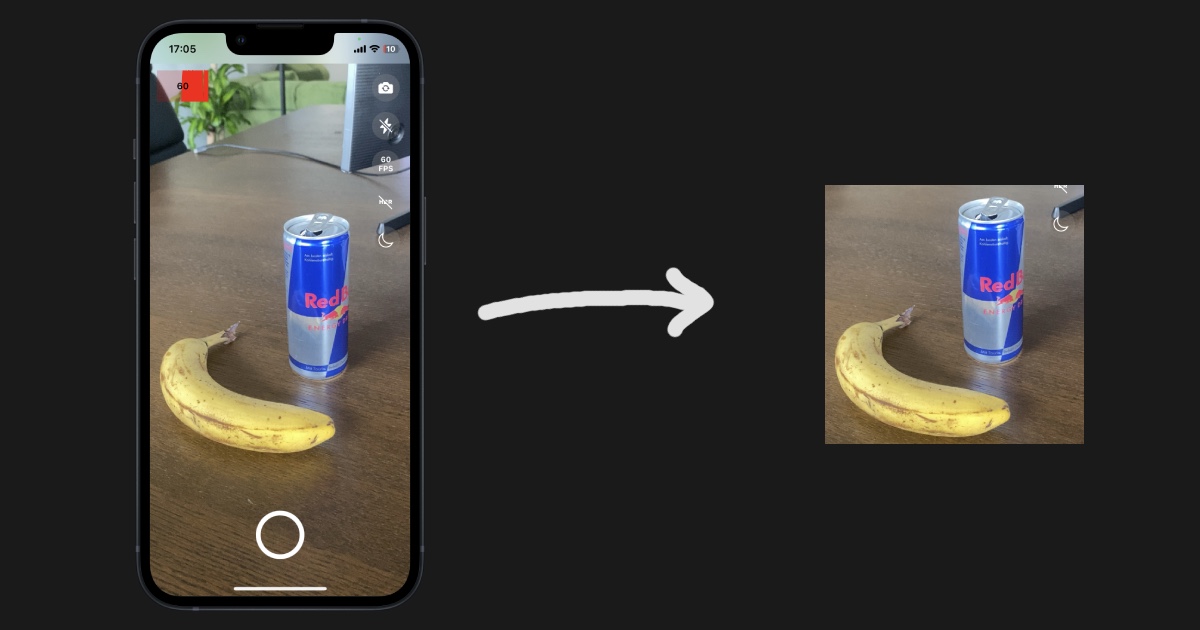
1. Crop the Image
The input Frame might have a different aspect ratio than the Model's expected input Image. In this case, we have a 1080x1920 Camera Frame which needs to be resized to 192x192. As you can see, the aspect ratios of that are different, so we need to crop the image to match the ratios.
Since 192x192 is a 1:1 aspect ratio, we want to transform our 1080x1920 into a 1:1 aspect ratio as well, so the resulting image would be 1080x1080, shaving off a few pixels above and below that square.
There's a neat little trick we can do with pointer arithmetic that allows us to crop the image without having to allocate any additional buffers - and it's pretty much free in terms of computational cost!
Since an image is represented as an array of numbers, we can simply start reading that array a bit later and stop reading a bit earlier - effectively ignoring the part above and below our square:
#define AdvancePtr( _ptr, _bytes) (__typeof__(_ptr))((uintptr_t)(_ptr) + (size_t)(_bytes))

vImage_Buffer vImageCropBuffer(vImage_Buffer buf, CGRect where, size_t pixelBytes) {
  // from https://stackoverflow.com/a/74699324/5281431
  return (vImage_Buffer) {
    .data = AdvancePtr(buf.data, where.origin.y * buf.rowBytes + where.origin.x * pixelBytes),
    .height = (unsigned long) where.size.height,
    .width = (unsigned long) where.size.width,
    .rowBytes = buf.rowBytes
  };
}
This was pretty mindblowing to me when I found out you can do that! 🤯 So to crop that to the desired aspect ratio now, we use:
// Crop Input Image buffer to fit tensor input aspect ratio
CGFloat scaleW = (float)srcBuffer.width / (float)targetWidth;
CGFloat scaleH = (float)srcBuffer.height / (float)targetHeight;
CGFloat scale = MIN(scaleW, scaleH);
CGFloat cropWidth = targetWidth * scale;
CGFloat cropHeight = targetHeight * scale;
CGFloat cropTop = ((float)srcBuffer.height - cropHeight) / 2.0f;
CGFloat cropLeft = ((float)srcBuffer.width - cropWidth) / 2.0f;
size_t size = srcBuffer.rowBytes * srcBuffer.height;
auto croppedBuffer = vImageCropBuffer(srcBuffer,
                                      cropRect,
                                      size);
The buffer "croppedBuffer" now points to the cropped Camera Frame without having modified any data.
2. Resize the Image
Since the cropped Camera Frame is still in it's original size (1080x1080), we need to downscale it to the model's size (192x192).
We need a second buffer for this, which is width * height * pixelSize * valueSize big. In our case, this is 192 * 192 * 3 * 1. For the downscaling, we can use the vImageScale_ARGB8888 function:
size_t rowBytes = (float)croppedBuffer.rowBytes / croppedBuffer.width * targetWidth;
auto downscaledBuffer = (vImage_Buffer) {
  .data = malloc(rowBytes * targetHeight),
  .width = targetWidth,
  .height = targetHeight,
  .rowBytes = rowBytes
};
vImage_Error imageError = vImageScale_ARGB8888(&croppedBuffer,
                                               &downscaledBuffer,
                                               nil,
                                               kvImageNoFlags);
if (imageError != kvImageNoError) {
  throw std::runtime_error("Failed to downscale input frame!");
}
The buffer "downscaledBuffer" now points to the cropped + downscaled Camera Frame.
3. Resample the Image
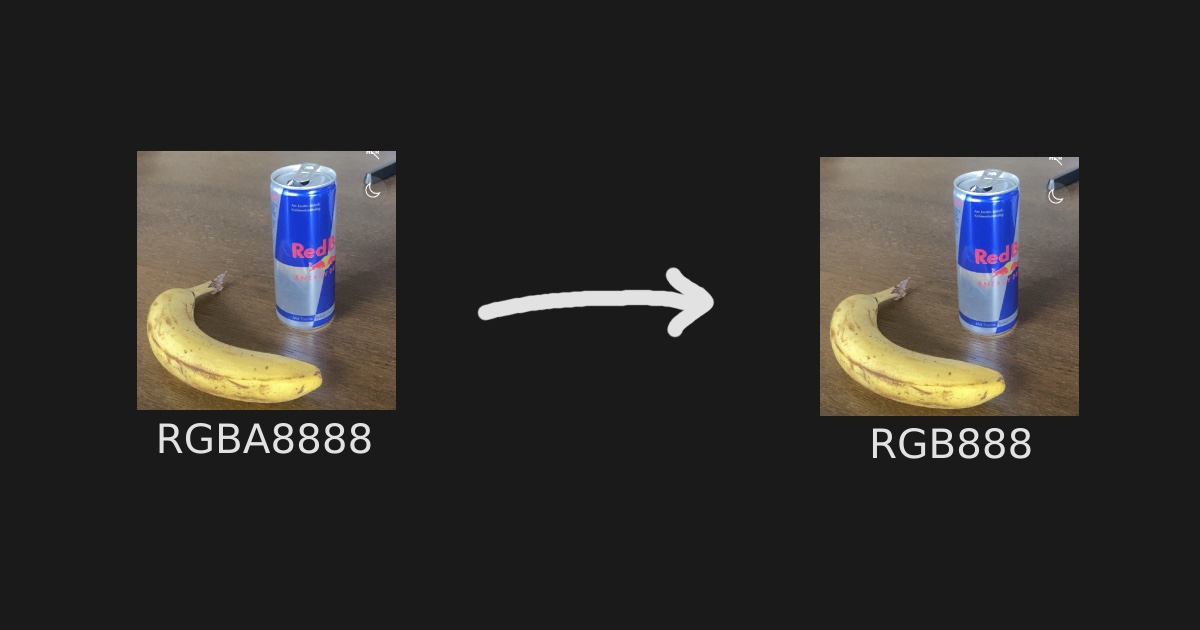
Since the Camera Frame is still in RGBA format (RGB + Alpha instead of only RGB) we need to re-sample the Image and transform it into the expected pixel format (RGB).
In this case, I configured the camera with the pixel format BGRA8888, so we can do that conversion using the vImageConvert_BGRA8888toRGB888 function:
size_t rowBytes = pixelSize * targetWidth * sizeof(uint8_t);
auto resampledBuffer = (vImage_Buffer) {
  .data = malloc(rowBytes * targetHeight),
  .width = targetWidth,
  .height = targetHeight,
  .rowBytes = rowBytes
};
vImage_Error imageError = vImageConvert_BGRA8888toRGB888(&downscaledBuffer,
                                                         &resampledBuffer,
                                                         kvImageNoFlags);
If the Camera Frames were to be in YUV pixel format, we need to use a different vImage function to convert from those spaces.
Optionally, for Float32 inputs you can use:
size_t rowBytes = pixelSize * targetWidth * sizeof(float32_t);
auto resampledBuffer = (vImage_Buffer) {
  .data = malloc(rowBytes * targetHeight),
  .width = targetWidth,
  .height = targetHeight,
  .rowBytes = rowBytes
};
vImage_ErrorimageError = vImageConvert_16UToF(&downscaledBuffer,
                                              &resampledBuffer,
                                              0.0f,
                                              1.0f / 255.0f,
                                              kvImageNoFlags);
Which also scales the pixels from 0..255 to 0..1.
Running our Model
Back to our run(Frame*) function - let's call all of this!
jsi::Value TensorflowPlugin::run(jsi::Runtime &runtime, Frame* frame) {
  CVPixelBufferRef pixelBuffer = CMSampleBufferGetImageBuffer(frame.buffer);

  vImage_Buffer resizedFrame = _frameResizer->resizeFrame(pixelBuffer);

  // ...
}
And voilà - we have a cropped, downscaled and resampled Camera Frame! 👏
I ran a quick benchmark and noticed that the Accelerate / vImage APIs are really fast - the entire conversion here is executing in less than 3 milliseconds!
And now the moment of truth... Let's feed that into the model!
NSError* error;
auto nsData = [NSData dataWithBytes:resizedFrame.data
                             length:resizedFrame.rowBytes * resizedFrame.height];
[_inputTensor copyData:nsData error:&error];
if (error != nil) {
  throw std::runtime_error("Failed to copy input data to model!");
}
..and then run it!
[_interpreter invokeWithError:&error];
if (error != nil) {
  throw std::runtime_error("Failed to run model!");
}
To call that from JavaScript we now simply use it in our Frame Processor:
const model = useTensorflowModel(require('./object-detector.tflite'))

const frameProcessor = useFrameProcessor((frame) => {
  'worklet'
  const results = model.run(frame)
  console.log(`Got ${results.length} results!`)
}, [model])

return <Camera frameProcessor={frameProcessor}>
And boom! The model runs perfectly fine without any errors. We can see our RAM usage in XCode rapidly growing which is because we are not deleting any of the buffers we are allocating in the frame resizing part, so let's quickly refactor that to class variables.
Also, in our C++ destructor we need to free the buffers:
FrameResizer::~FrameResizer() {
  free(_inputDownscaledBuffer.data);
  free(_inputReformattedBuffer.data);
}
Reading the output
Just like the input tensor, an output tensor has a given shape and size. The only difference is here that there can be multiple output tensors in such models. For example, the object detection model has 4 output tensors:
detection_boxes: Bounding box for each detection.detection_classes: Object class for each detection.detection_scores: Confidence scores for each detection.num_detections: Total number of detections.
And each of those output tensors has a specific shape. The shape tells us how to interpret the output data, but for now we just want to get that data back to JavaScript.
To read the data from those tensors I'm looping through each tensor and just reading it's binary data:
size_t outputTensorsCount = _interpreter.outputTensorCount;
jsi::Array result(runtime, outputTensorsCount);
for (size_t i = 0; i < outputTensorsCount; i++) {
  TFLTensor* outputTensor = [_interpreter outputTensorAtIndex:i error:nil];
  NSData* data = [tensor dataWithError:nil];
  // TODO: Convert data to JS Value
}
return result;
To convert that to a JS Value, we could use a jsi::Array:
NSData* data = [tensor dataWithError:nil];
jsi::Array result(runtime, data.length);
for (size_t i = 0; i < data.length; i++) {
  result.setValueAtIndex(runtime, i, jsi::Value((int)data[i]));
}
Which returns us all the output data to JavaScript:
const frameProcessor = useFrameProcessor((frame) => {
  'worklet'
  const results = model.run(frame)
  console.log(results)
  // [[100], [100], [100], [1]]
  console.log(results[0])
  // [0.2435, 0.32535, 0.43123, 0.58545, ...]
}, [model])
However this is extremely slow as jsi::Value is an additional number allocation in the jsi::Runtime each time, and numbers in JavaScript are stored as 64-bit doubles. This involves type checking, leaving space for special flags, and resizing our 8-bit values to 64-bit, which is a lot of wasted space.
Instead, we can use ArrayBuffers. The Expo codebase contains a C++ implementation of TypedArray, which I use in VisionCamera. With that, I can create a Uint8Array on the native side and simply copy the memory over.
This uses 8-bits for each number instead of 64-bits, and is much faster since it's just a simple memory copy instead of a loop.
NSData* data = [tensor dataWithError:nil];
TypedArray<TypedArrayKind::Uint8Array> result(runtime, data.length);
result.update(runtime, data.bytes, data.length);
I've seen more than 10x performance improvements with typed arrays.
As an additional performance improvement, we can pre-allocate the arrays on model creation, as we know the output shape upfront. This way we avoid the TypedArray instantiation each frame.
Interpreting the data
We've come so far, but what does [0.2435, 0.32535, 0.43123, 0.58545, ...] mean? I don't see any red boxes on my screen yet...
This is because we need to know how to interpret the data.
In our case, reading the page for the object detector we know that the first output tensor contains the bounding boxes, and the third output tensor contains the scores.
The first output tensor has a shape of [100, 4], meaning 100 * 4 = 400 items. Every 4 items is one bounding box, so we can read it like this:
const frameProcessor = useFrameProcessor((frame) => {
  'worklet'
  const results = model.run(frame)
  const boundingBoxes = results[0]

  for (let i = 0; i < boundingBoxes.length; i += 4) {
    const boxTop = boundingBoxes[i]
    const boxLeft = boundingBoxes[i + 1]
    const boxBottom = boundingBoxes[i + 2]
    const boxRight = boundingBoxes[i + 3]
  }
}, [model])
But since this contains 100 bounding boxes, how do we know which one to draw to the screen?
This is what the third output tensor is for, it tells us the scores (confidence) for each of those detections. This is expressed in percent, from 0.0 to 1.0.
Playing around with the model made me come to the conclusion that anything above 40% confidence (0.4) can be drawn, so to do that we use the following:
const frameProcessor = useFrameProcessor((frame) => {
'worklet'
const results = model.run(frame)
const boundingBoxes = results[0]
const scores = results[3]
for (let i = 0; i < scores.length; i++) {
const confidence = scores[i]
if (confidence > 0.4) {
const top = boundingBoxes[i]
const left = boundingBoxes[i + 1]
const bottom = boundingBoxes[i + 2]
const right = boundingBoxes[i + 3]
}
}
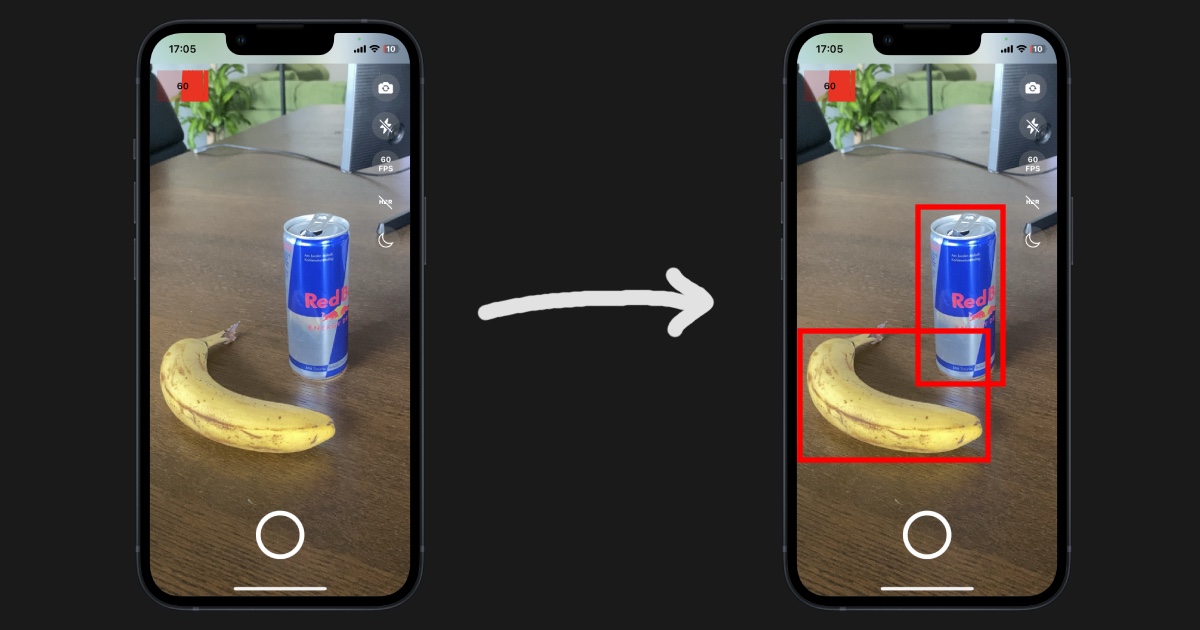
}, [model])Now to demonstrate our model, we want to draw red boxes around the objects we detected.
Thanks to the React Native Skia integration in VisionCamera V3 we can simply draw anything onto the Frame using Skia's simple JavaScript API - under the hood this is GPU-accelerated by Metal:
const paint = Skia.Paint()
paint.setStyle(PaintStyle.Stroke)
paint.setStrokeWidth(20)
paint.setColor(Skia.Color('red'))

const frameProcessor = useFrameProcessor((frame) => {
  'worklet'
  const results = model.run(frame)
  const boundingBoxes = results[0]
  const scores = results[3]

  for (let i = 0; i < scores.length; i++) {
    const confidence = scores[i]
    if (confidence > 0.4) {

      const top = boundingBoxes[i]
      const left = boundingBoxes[i + 1]
      const bottom = boundingBoxes[i + 2]
      const right = boundingBoxes[i + 3]
      const rect = Skia.XYWHRect(left, top, right - left, bottom - top)
      frame.drawRect(rect, paint)
    }
  }
}, [model])
And abra kadabra - the app is now drawing red boxes around objects! 🪄

Even I was a bit surprised when this was running perfectly smooth at 60 FPS even though we are using JavaScript for calling the model, reading the output and drawing everything 🤯
If you want to try this for yourself, check out this branch/PR and just run the app. You can drop any .tflite model you want into example/assets/, and adjust your output data interpretation in example/src/CameraPage.tsx as you like.
All of this... for what?
I built all of this in 2 days and just wanted to experiment with what's possible for VisionCamera. This integration is groundbreaking since it makes processing on mobile easier than it has ever been before.
Easier 🐰:
No more native code - the user can write a few lines of JavaScript code to spin up a Camera, a few more lines to run a TensorFlow model in realtime, and a few more lines to draw anything to the screen using Skia - whether it's red boxes, filters, or blur effects. And let's be honest, JavaScript is really easy.
Faster 🔥:
Under the hood this is highly optimized:
- Accelerate / vImage is used for fast image manipulation/cropping (GPU)
- Metal or CoreML is used to speed up the TensorFlow computation (GPU)
- Metal is used for drawing operations in Skia (GPU)
- Metal is used for rendering the Camera Preview Frames (GPU)
- Buffers are pre-allocated and efficiently shared to JavaScript without full copies
- JSI / C++ is used for efficiently communicating between JS and native
Less code 🤿:
Setting up a Camera, TensorFlow, or Skia is insanely complex. In a fully native app this requires hundreds if not thousands of lines of code. With VisionCamera this can be reduced to less than hundred lines of code!
Flexible 💪:
The TensorFlow Lite models can be swapped out at runtime - simply drop a new .tflite file into the src/assets/ folder and hit save - React Native will fast-refresh the changes and you don't need a full app rebuild!
The future
I am still working on VisionCamera V3, which is the core foundation on what this is built on - without V3 I cannot release this.
I'm actively looking for sponsors to support my work so I can continue to work on this and release V3 as soon as possible!
If you like what I'm doing, please consider sponsoring me on GitHub 💖.